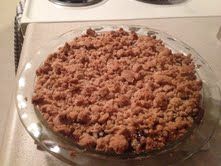
Blueberry Crumble Pie
This dish is the perfect way to get into the blueberry season. In the Pacific
Northwest, our Blueberry harvest can start as early as May, but you usually
start getting the really sweet plump berries a little further into June. While this
dish absolutely can be made with frozen berries, I recommend using fresh ones.
WHAT YOU WILL NEED
Crust
1 ½ cup flour (for
gluten free, I recommend Bob’s Red Mill GF flour blend)
¼ cup granulated
sugar
1 tsp baking
powder
½ tsp salt
¾ stick of butter
(for dough, always use cold butter)
1 egg
1 egg yolk
Filling
3 packages of fresh blueberries (about 6 cups)
½ cup granulated sugar (most recipes call for ¾ cup, I find that this is
sweet enough that it is ok to reduce it)
4 tbsp cornstarch
2 tbsp water
¼ tsp nutmeg
3 tbsp cold butter
Crumble Topping
1 &¼ cup flour
1 tsp baking powder
½ tsp cinnamon
½ cup light brown sugar
1 stick of butter (melted)
Preparing your crust;
Combine the flour, sugar, baking powder, and salt in food processor and
pulse about 5 times to insure that all ingredients are mixed.
Add the butter and pulse repeatedly until butter is mixed in well with dry
ingredients.
Add the egg and egg yolk and mix until the dough begins to form a ball. (Have
patience, it may take a minute.)
Next, take your dough and place it onto a well-floured surface. You want
to roll it out until it is about a ½ inch thick.
Preparing your crumble topping;
For this, combine flour, baking powder, cinnamon and nutmeg in a bowl. Mix
well.
Next, stir your brown sugar into the melted butter, and then add to your
dry ingredients bowl.
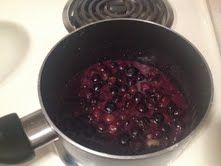
Preparing your filling;
In a saucepan over low heat, add half of your blueberries. For this you
will need to stir often to ‘bruise’ the berries. This will help them to release
their juices.
Next, add your sugar and keep stirring! This will take about 10 minutes
but eventually the blueberry juices will dissolve the sugar and the mixture
will come to a boil.
While the blueberries are heating up, mix your cornstarch and your water
together, after the blueberry mixture comes to a boil, add your cornstarch
mixture and stir well.
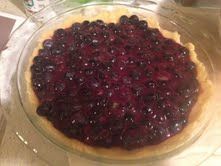
After the cornstarch and water are dissolved into the blueberries, you can
transfer the contents of your sauce pan into a bowl with the rest of your
blueberries, and your cold butter. Mix several times, then transfer to your pie
crust.
The last step in this recipe is to take your crumbled topping that you set
aside, and sprinkle it over your pie. Once pie is assembled, bake at 350
degrees until topping is golden brown. This should take about 40 minutes
depending on your oven. It is important to let the pie cool down for at least
10 minutes after baking to let the filling set up.
Enjoy!